In today’s episode, we’re going to be continuing our three.js course by importing exported blender file into our Webflow project.
A few weeks ago we took a look at how to store your external Webflow assets, this could be CSS, JavaScript. In this case, we’re going to be uploading our Blender files or more specifically our GLTF files to those external storages and then we’re going to import them into our three.js scene.
3D File Types
When it comes to three.js and 3D in general, there are literally hundreds of different file types, and they all have their different pros and cons. Some of them are based on performance, some of them literally just what information is contained within those files. A lot of them are stored in JSON format, whether you’re embedding the textures or whether you’re referencing external ones.
It gets messy.
We’re going to be using a standard that’s gained a lot of traction, a lot of a lot of pieces of software support, and export it. It just seems to be a 1 size fits all for a lot of situations. But just know that you get more deeper into three.js code, you’re going to be more sensitive to what file types you use for various different circumstances. For our intents and purposes, GLTF is going to be the file type that we’re going to use for our project. It won’t necessarily be the best solution, but that’s what we’re going to go with because it’s just the easiest to work with.
GLTFLoader
We need to load in the loader that’s responsible for loading in GLTF files. It’s is actually a big bit of code which is why we need to import a separate module to enable us to do that.
In our imports here, we want to add a new line of code and map “three/addons” to…
https://unpkg.com/three@<version>/examples/jsm/You’re going to want to replace <version> that matches the three.js version you’re using (we’re using 0.149.0)
Net we need to actually load it.
import { GLTFLoader } from "three/addons/loaders/GLTFLoader";Three.js Editor
We wont be going over how to export your GLTF files from blender. Instead follow this tutorial but what do think is worth mentioning is that if you go to threejs.org/editor. You can import your files into this very basic three.js editor. This is a good way to test whether the file actually works. You can also manipulate things, add new materials or just change the positions of things. three.js editor is a really good way just to add the final touches to to your file, or maybe change it without involving a designer.
GLTF Transform
GLTF Transform compresses and and optimizes your GLTF files to make them smaller, and various other things. I primarily use it for Webp texture compression. So after you install the CLI tool, and then you can compress your file even further.
gltf-transform webp [LINK-TO-FILE]I got our Fox the Kronos Group sample models and I chose this 1 because it’s got some animations bound to it. I’ve uploaded this to AWS and got the public link. Reference our other video on choosing the storage service.
Loading Our GLTF File
We’re going to create a function called loadFox and call it from our constructor.
// constructor
this.loadFox()

// class level
loadFox() { }
We then need to create an instance the GLTF loader and load our fox with the load method and paste in our URL to our GLTF file.
// loadFox
const gltfLoader = new GLTFLoader()
gltfLoader.load('<url-to-asset>')
We get access to 3 functions. The first function is on the success of the of the load. The second function will be progress and that might be handy for a loading bar. The third 1 will be on the error.
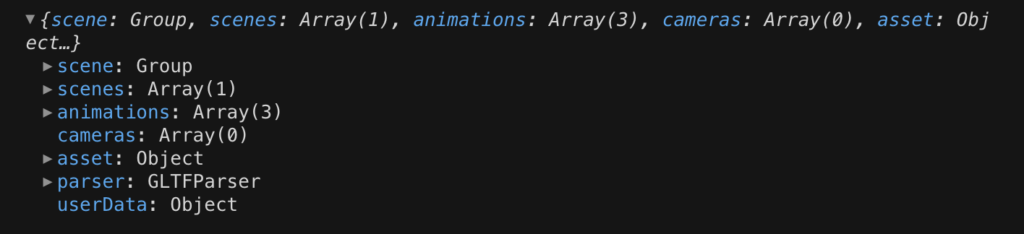
Inside the success function, we get access to the object that gets loaded. Logging the object, this is what we’re going to be working with. This is the fox.
gltfLoader.load(
  '<url-to-asset>',
  (gltf) => console.log('success', gltf),
  () => console.log('progress'),
  () => console.log('error')
)
Adding to our Scene
You wont see it on our screen yet because we’ve not loaded into our scene, as you need to do with every single three.js object but let’s just take a look at the object before we do that. You can see we’ve got animations to play with, cameras, scenes and individual objects. You’ve got access to everything that you would expect so if you want to know the scale, if you want to manipulate the scale, you can treat this as any other object now as if it was created inside of three.js.
Let’s now add it to our scene.
this.scene.add(gltf.scene)We also need to add some lights. So we’re just going add some ambient lights. Ambient light is just light from every direction.
// constructor
this.addLights();

// class-level
addLights() {
  const ambientLight = new THREE.AmbientLight()
  this.scene.add(ambientLight)
}
And now you can see our fox. And it is huge.
Groups
We want the Fox to appear like it’s standing on our box as it moves so we’re going to wrap both of these inside of a group.
Let’s sort the scale of this fox out for now.
gltf.scene.scale.set(0.03, 0.03, 0.03)That’s a more manageable size. Now we’re going to create our group for the box.
// createBox
this.group = new THREE.Group()

// +
this.group.add(this.box)
this.scene.add(this.group)
// - this.scene.add(this.box)
Refreshing you should see no changes. Perfect. And now we’re going to this fox to the group and move that fox up a little bit.
// addFox
// +
gltf.scene.position.y = 0.5
this.group.add(gltf.scene)
// - this.scene.add(gltf.scene)
Now we’re gonna want to rotate the group instead of just the box which is totally practical.
// animate

// +
gsap.to(this.group.rotation, {
// - gsap.to(this.box.rotation, ( ...
Animation Mixer
Let’s now let’s look at the animations that we have access to in the fox GLTF file.
To be able to fade between animations we need a mixer and add our GLTF file to it as that contains the animations.
gltf.load('<asset>', (gltf) => {
  // success method
  this.mixer = new THREE.AnimationMixer(gltf.scene)
})
Now we’re going reference the individual actions which are in an array to be able to mix between them and then play the first action.
// gltf success method
this.mixer = new THREE.AnimationMixer(gltf.scene)
this.action1 = this.mixer.clipAction(gltf.animations[0])
this.action2 = this.mixer.clipAction(gltf.animations[1])
this.action1.play()
What you’ll notice that nothing’s happening and that’s because we need update the mixer with every animation tick. First we need to create a clock to track the time that has passed and use the delta to update the mixer.
// constructor
this.clock = new THREE.Clock()

// animate
if (this.mixer) {
  this.mixer.update(this.clock.getDelta())
}
We’ve now got something playing!
Mixing Between Animations
To be able to mix between other animations we need to fade between the different actions by tracking the currently playing action. Here’s a function I’ve found. What this does, it takes a new action and a duration which is preset at 0.2 seconds
// class-level
fadeToAction(action, duration = 0.2) {
}
We need to set a currently active action in order to set the previous action and line up a new action.
When we first in our load of the fox we need to set the first acton as the currently playing action and play that instead. We should see everything running fine as before.
// gltf success method
this.mixer = new THREE.AnimationMixer(gltf.scene)
this.action1 = this.mixer.clipAction(gltf.animations[0])
this.action2 = this.mixer.clipAction(gltf.animations[1])
// +
this.activeAction = this.action1
this.activeAction.play()
// - this.action1.play()
Now we’re tracking the currently active action, we can set the new action inside of the fade method as the one that’s passed and fade out the previous currentAction at a given duration.
We then need to fade in the newAction.
fadeToAction(action, duration = 0.2) {
  const previousAction = this.activeAction
  this.activeAction = action

  if (previousAction !== this.activeAction) {
    previousAction.fadeOut(duration)
  }

  this.activeAction
    .reset()
    .setEffectiveTimeScale(1)
    .setEffectiveWeight(1)
    .fadeIn(duration)
    .play()
}
Now we just need to call this function and pass a new action wherever we need to fade to a new animation whether that be on a click or otherwise.
// setEvents
const titles = Array.from(document.querySelectorAll("h2"));
titles.forEach((title) => {
  title.addEventListener("mouseover", () => {
    this.fadeToAction(this.action2)
    this.isHovering = true
  })
  title.addEventListener("mouseleave", () => {
    this.fadeToAction(this.action1)
    this.isHovering = false
  })
})
Check out the final code here.